💀 Step-by-Step: Perfecting the Skeleton Look—From Flat Face Paint to Detailed Bone Structure
The simple skeleton provides one of the best lessons in light and shadow in makeup artistry. You are essentially painting a three-dimensional model (the skull) on a dynamic, fleshy canvas (your face). To succeed, you have to forget the natural outline of your features and impose a hard, hollow structure of bone.
Section 1: The Essential Toolkit for an All-Night Look
A common mistake is to use cheap, waxy store-bought kits. These often streak, crack, and melt in the heat of a party. Investing in some quality supplies will guarantee a more professional, comfortable, and durable result.
1. The Right Products
| Product Category | Purpose | Key Recommendation |
| Primer | Creates a skin barrier, smooths texture, and ensures paint adhesion. | A matte, oil-free primer or specialized theatrical product (like a barrier spray). |
| Base White | The core color for the skull’s structure. Must be opaque. | Water-activated paint (ideal for clean lines, fast drying) or professional-grade cream/grease paint (ideal for blending). |
| Base Black | Creates the negative space (hollows). Must be highly pigmented. | Cream paint or high-quality, matte black eyeshadow for easier blending. |
| Shading | Adds three-dimensionality and depth (the “contour”). | A matte grey or taupe eyeshadow (essential for blending black into white). |
| Setting Agent | Locks the entire look down and prevents smudging. | Translucent setting powder (silica or mineral-based) and a heavy-duty setting spray. |
2. Brushes and Sponges
You need precision and blending power:
- Large Flat Brush/Stipple Sponge: Specially used for applying white base evenly and quickly to large areas.
- Small angled/flat brush: Important for drawing the precise outline of the teeth and hard lines of the jaw.
- Fluffy Blender Brush: The most important brush. Grey/black contours are used to apply and seamlessly diffuse colors, making shadows look soft and realistic.
- Detail Brush: A very thin, pointed brush for drawing realistic bone cracks and small details.
Section 2: Building the Canvas—Foundation and Hollows
Start with a clean, moisturized, and primed face. Allow the primer to dry completely before applying any color.
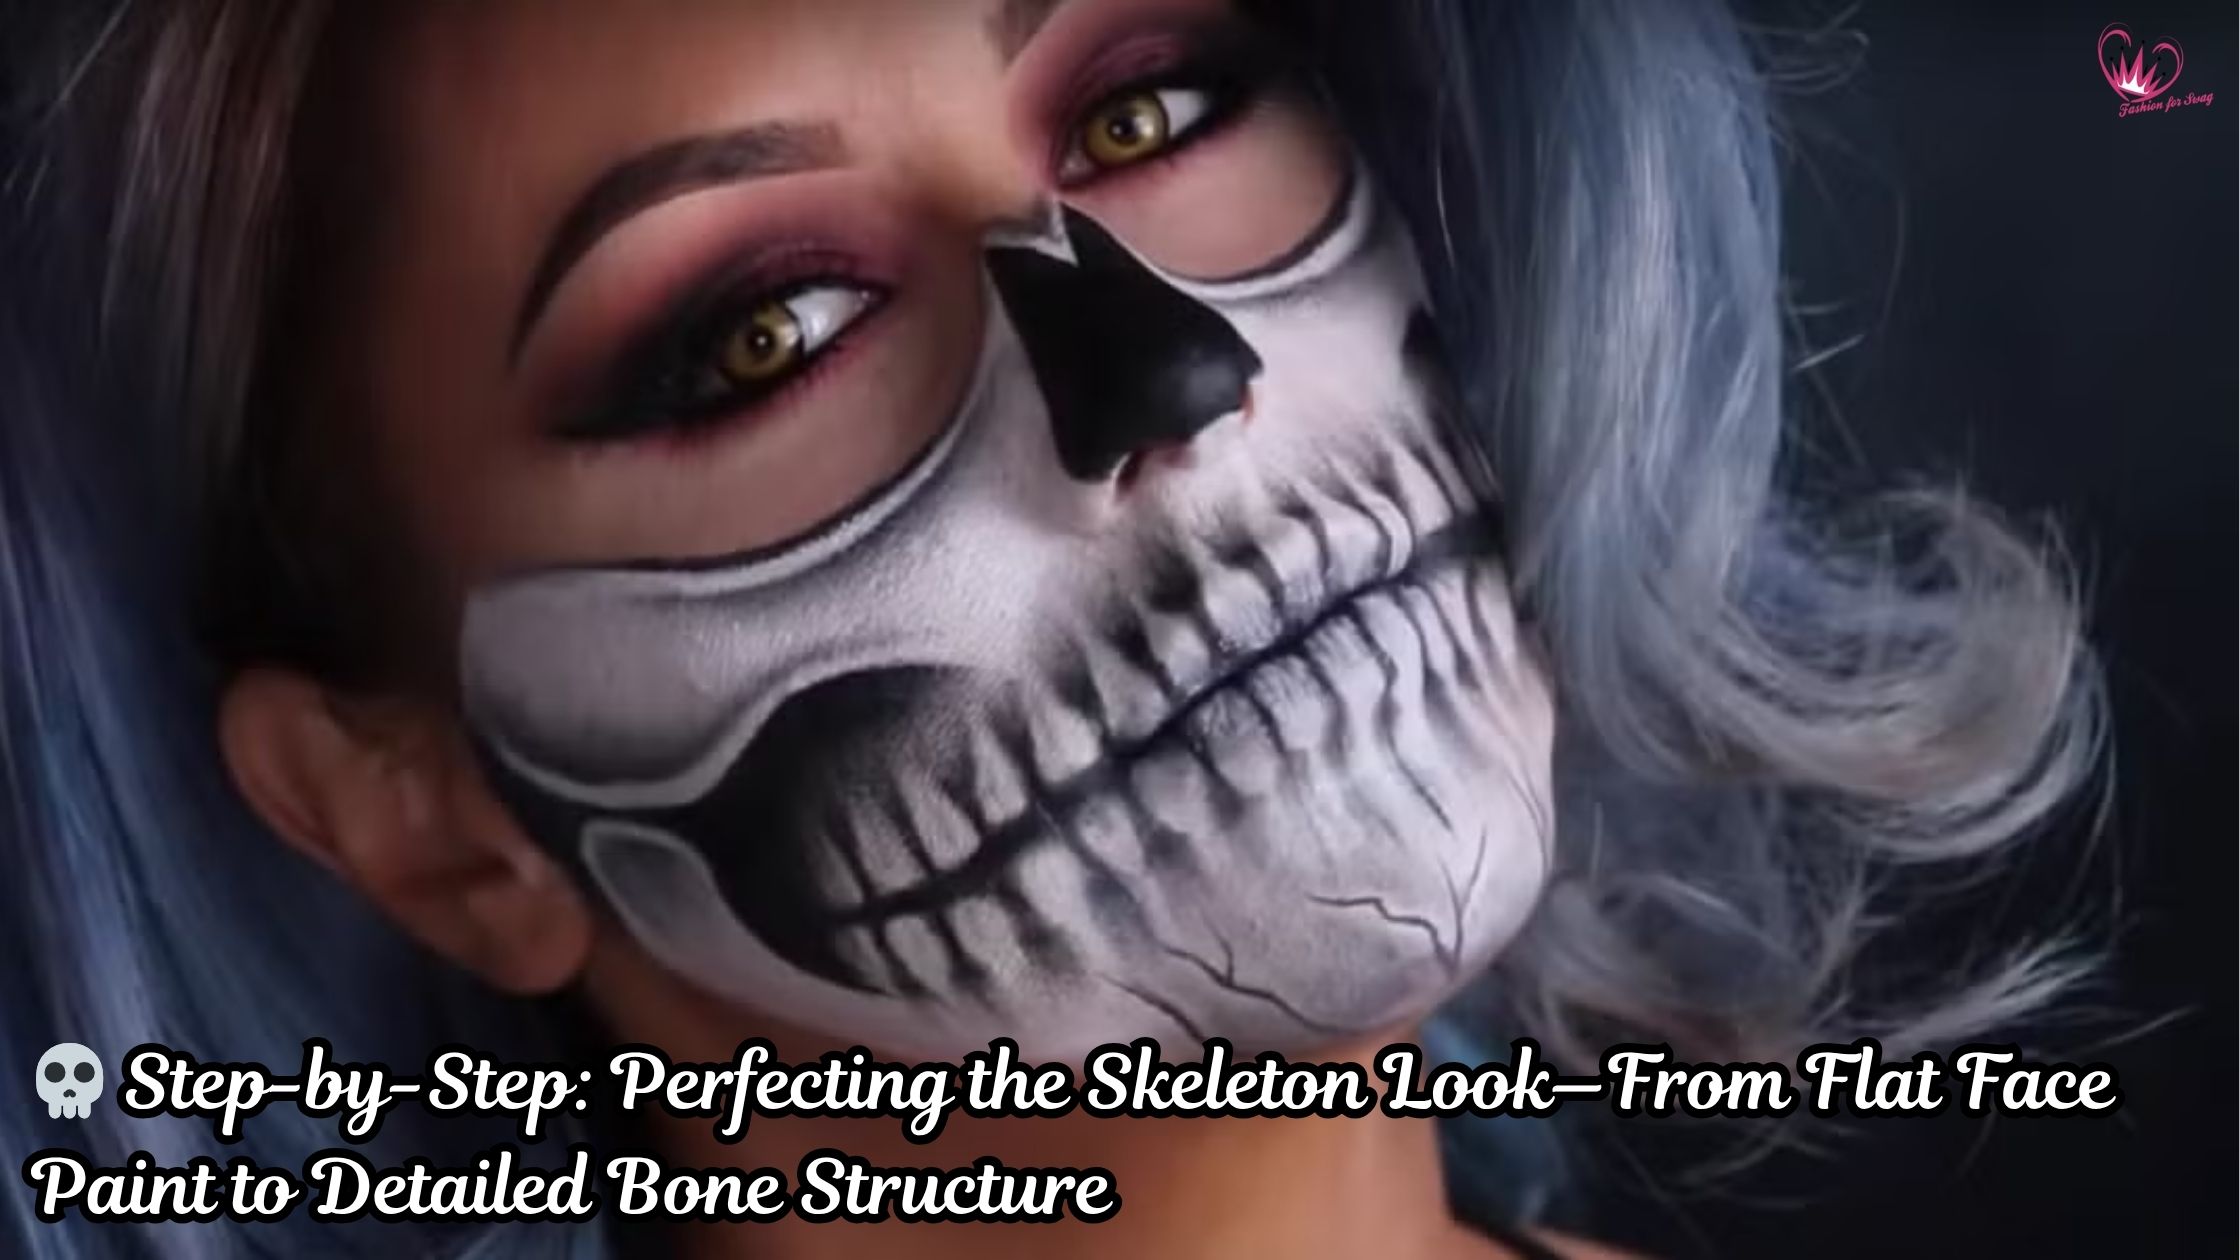
Step 1: Laying the Opaque White Base
Map out the white: Use your larger brush or sponge to apply the white color all over the face, right up to the hairline and down to the neck.
- Avoid hollow spots: Don’t color areas that will be pure black: the eye sockets, nasal cavity, and central mouth area. Maintaining undyed skin here makes applying black easier and cleaner.
- Achieve opacity: Dab or pat the white instead of swiping it to get a thick, even layer of color. This prevents streaks from forming and ensures that the white really pops against the black.
- Seal the white: Once the base is dry (especially important for water-activated paint), lightly sprinkle the entire white area with translucent setting powder. This initial seal will prevent the black paint from getting dirty when it touches the white paint.
Step 2: Defining the Black Hollows
The hollows create the essential negative space that defines the skull.
- Eye socket: Using black or eyeshadow, fill in under your brow bone and the entire area around your eyes, extending the shape beyond the corners of your eyes and slightly downwards to the upper cheekbones. This creates a deep, disturbing hollowness.
- Nasal cavity: Imagine an inverted heart or elongated kite shape on the bridge of your nose, extending down to the tip. Fill this area completely with black color. The strong contrast makes it appear as if the cartilage has completely disappeared.
- Cheek/temple hollows (initial mapping): Suck in your cheeks. Wash and apply black color in the deep depression below your cheekbones. Use this black color to create a sweeping shadow that curves down from the hollow of your temple to your cheekbones. Blend the edges quickly.
Section 3: Mastering the Teeth and Detached Jaw
The teeth and jawline require precision to look skeletal, not cartoonish.
Step 3: Outlining the Teeth Structure
- Create a mouth frame: Use your black paint and a flat brush to create a wide, exaggerated smile line, extending the corners far beyond your natural mouth. Fill in the area outside your natural lips and inside this new smile line with black. This dark area will be the “hollow” or “gum” around the tooth.
- Block out the teeth: Using your clean white paint and small angled brush, draw teeth shapes on the black area. Make them slightly square or round, making sure the black space between the teeth is uniform.
- Teeth Realism: Avoid creating perfect 8 front teeth. Aim for asymmetry – some teeth a little wider, some shorter, and make sure the canines are distinctly pointed.
Step 4: Defining the Separated Mandible
The lower jaw bone (mandible) should look like a separate piece of bone.
- Jaw line: Using black paint, draw a separate line defining the lower curve of the jaw bone, extending from the ear down to the center of the chin.
- Hinge: Draw a clear circular black shadow just below the ear – this is the mandibular fossa, the hollow part where the jaw connects to the skull.
- Bone effect: Use your white paint to draw a thin, clear highlight line along the upper edge of the black jaw outline. This is an important step: the black line creates depth, and the white line makes the jawbone look as if it is raised and separated from the neck cavity.
Section 4: The Art of Three-Dimensional Contouring (Shading)
This is the most important section. If you only use black and white, the look is flat. The gray and brown shadows create the illusion of the actual bone shape.
Step 5: Sculpting the Protrusions
Switch to your fluffy blender brush and matte gray or taupe eyeshadow. Apply shadow to areas where muscle and tissue have receded, making the edges of the bone sharper.
- Forehead: Gently outline the brow bone and temple lines with the brown color, blending it outward onto the white forehead.
- Cheekbone Ridge: Instead of shading just below the cheekbones, use gray to shape the bone. Draw a diagonal gray line from the side of the nose to the hollow of the temple. Blend the gray towards the lower cheek to create a gradient. It emphasizes the zygomatic arch.
- Orbital Ridge: Use a clean, small blending brush to apply a soft wash of gray just outside the hard black eye socket line. This is the orbital ridge, the bony structure that makes the eye round and deeply hollow.
Step 6: Adding Decay and Bone Texture
To age the look, stay away from perfect white bone.
- Bone texture: Take your black eyeshadow and a small, stiff brush. Lightly tap or dab the black color onto random areas of the white bone, especially around the temples and along the sides of the cheekbones. Then, gently pat brown matte eyeshadow onto these same areas. This gives the impression of grime, decay, or serious dirt, which adds incredible realism.
- Tooth Decay: For a truly sinister smile, apply a small amount of brown or dark ocher color near the gum line of some teeth to create the appearance of decay or staining.
Section 5: The Finishing Details and All-Night Sealing
Step 7: The Hairline Cracks
This is where the skeleton gets personality.
- Tools: Use your best detail brush and black paint (or liquid eyeliner for maximum precision).
- Placement: Draw thin, jagged, imperfect lines starting at high-tension points such as the center of the forehead, temples or jaw joint. The key to realism is to avoid straight lines. Let them crack and break into pieces, mimicking the natural micro-fractures in bone.
- Adding depth: For hyper-realism, paint a small, soft, gray shadow along the black crack line to give the illusion that the crack has depth.
Step 8: Highlighting the Structure
Now, we reverse the shading by highlighting the bone peaks.
- Highlights: Use a crisp, opaque white cream paint, a white eye pencil, or even a subtle metallic white eyeshadow.
- Strategic placement: Apply thin, bright lines at the very highest points: the center of the nose (nasal bone), the highest curve of the cheekbones, and the center of the forehead. These highlights catch the light and confirm the 3D illusion created by the shadows.
Step 9: Extending the Look to the Neck and Chest (Recommended)
Stopping at the chin breaks the illusion.
- Vertebrae: Draw a series of black, vertical oval shapes down the center of the neck to represent the spinal column. To make the neck look hollow and thin, do heavy contour around the neck with black and brown colors.
- Clavicle (collarbone): Find your natural collarbone ridges. Add a strong black shadow below them and a bright white highlight on top. This makes the bones look incredibly sharp and prominent.
- Rib cage: Use black lines to lightly depict the first few ribs on your upper chest, filling the space between them with black/grey shadow to give the illusion of an empty cavity beneath the skin.
Step 10: The Unbreakable Final Seal
Your working hours depend on this stage.
- Powder Sandwich: Go back over all dark and brown areas – especially the cheeks and eye sockets – with a final, heavy layer of translucent setting powder, pressing it in with a puff or dense brush.
- Setting Spray Shower: Generously coat your entire masterpiece with professional-grade, heavy-duty setting spray. Hold the bottle at arm’s length and spray until your face glows. do not touch it! Let it air dry for at least ten minutes. This creates a durable, flexible seal that will resist sweat, stains, and the inevitable Halloween festivities all night long.
By moving beyond simple outlines and embracing the power of outline and bone structure, your skeleton makeup will achieve a level of realism that is truly thrilling. Joyful ghost!